Installation and operation instructions for Sun Ray Solar pool heating system
Basic components for installation:
- Sun-Ray Solar Panels
- 2x3 redwoods or treated lumber (see item #1)
- ¼" x 4" lag bolts & washers (see item #1)
- Roofing cement (see item #1)
- 1 ½" DWV copper couplings (see item #2) or radiator hose connecters
- Plumbers tape & wood screws (see item #3)
- 1 ½" copper male adapters (see item #4)
- 2" PVC x 1 ½" female adapters (see item #4)
- 1 ½" copper cup (see item #5)
- Vacuum breaker & fittings (see item #6) (Grainger Item #6A772 )
- 1 ½" to ½" copper bell reducer (see item #6)
- ½" copper "M" adapter (see item #6)
- ½" copper "L" & 1" long ½" copper pipe (see item #6)
- 2" PVC pipe couplings & "L" (see item #7)
- 2" PVC check valve (see item #8)
- 2" PVC 3-way valve & (manual operation) 2" PVC "T" (see item #9)
- Automatic controller sensors and Flo-Verter (automatic operation only)


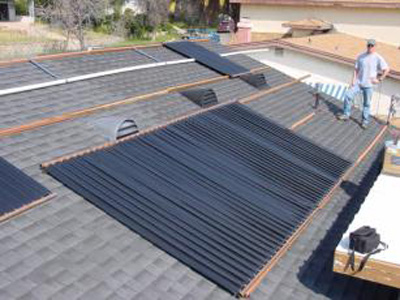
Typical roof Installation
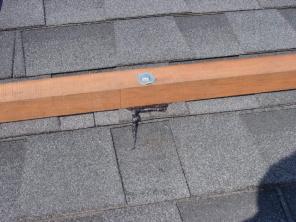
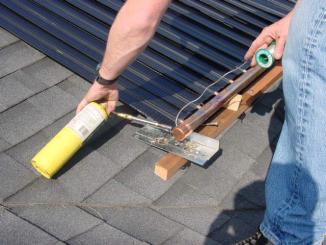
Install two parallel 2x3 redwood or treated lumber runners (see item # 1). Use ¼" lag bolts with a washer to fasten the runners to the roof. For a longer panel, install a third runner in the center to keep the panels from bowing. The wood runners must be installed with a slop to allow a complete drainage (the inlet point must be the lowest). The bolts should penetrate the roof rafters at 4' to 6' apart. "Sandwich" roofing compound at the bolt penetrations.
Clean the header with emery cloth as preparation for soldering. Flax and assemble the panels with 1 ½" copper couplings. Use wood blocks (same height as runners) to lift the assembled panel headers off the runners while soldering. Use a metal shield, wet rag and water squirt bottle while soldering to protect the roof from the torch flame and solder droppings.
Solder the vacuum breaker, cup end the 1 ½" male copper adapter. Allow the copper to cool and use Teflon tape to connect the 2" x 1 ½" PVC female adapters to the copper adapter thread. Run the 2" PVC pipe to and from the panel with a slope to allow complete drainage.
Tying to the pool equipment (manual operation)
First you need to determine the direction of the flow. Look at the pump first; the pump is sucking the water from the pool through the skimmer and to the filter. Out from the filter to the heater and back into the pool. The solar system is added on to the section of the pipe after the filter and before the heater so filtered water will be flowing through the solar panels.
- Cut the line between the filter and the heater.
- Install the 2" PVC check valve in the direction of the flow. The purpose of the check valve is to prevent back flow from the panels to the pool. (See item #8)
- Connect the inlet port of the three way valve to the line coming from the check valve.
- The second port of the three way valve should lead to the solar panel's inlet.
- The third port of the three way valve should be connected to a "T". Connecting the line coming from the panel's outlet and back to the heater if there is one, or back to the pool. (See item # 8)
- Install a small drainage tube to allow the panels to drain when the pump is off.
Tying to the pool equipment (automatic operation)

Please follow the installation instructions that are provided with the automatic controller.
Starting up for the first time
At this point the system is completely installed. All copper and PVC joints are connected and the vacuum breaker is installed.
If manual, turn the 3-way valve to flow through the panels.
If automatic, the controller is mounted and energized. The sensors are installed and the Flo-Verter valve is set to flow through the collectors.
- Turn on the pool pump and allow the air to flush out of the panel to the pool.
- Check for leaks and repair if needed.
- Check for an even flow distribution through out the bank.
- Check the valve operation. If an automatic valve is installed, set the controller on automatic operation or bypass. If manual, turn the 3-way valve to flow through the panels or bypass.
- Set the pool timer to operate during the sunny hours of the day. The system should begin functioning if the sun is shining.
- Verify that the panels are completely drained and empty when the system is off.
System Maintenance
Sun-Ray Solar pool heating systems require relatively little attention. But, as with any mechanical system, some basic maintenance is essential to keep the system functioning smoothly.
The panels and piping should be checked for leaks. The system should be checked at least twice per year for proper operation of the controller and sensors. The panels can be rinsed periodically to remove dust collected or bird droppings. The panels can be repaired by soldering if required. The panels can be repainted for a fresh look if required.
Freeze protection
In order to protect the panels from freeze damage, pool water must drain back into the pool when the pump is not running. Pool water should not be allowed to set in the panels for a long duration without circulation. (See item #1 about slope) (See item #6 about vacuum breaker). (See item #10 about drainage tube).